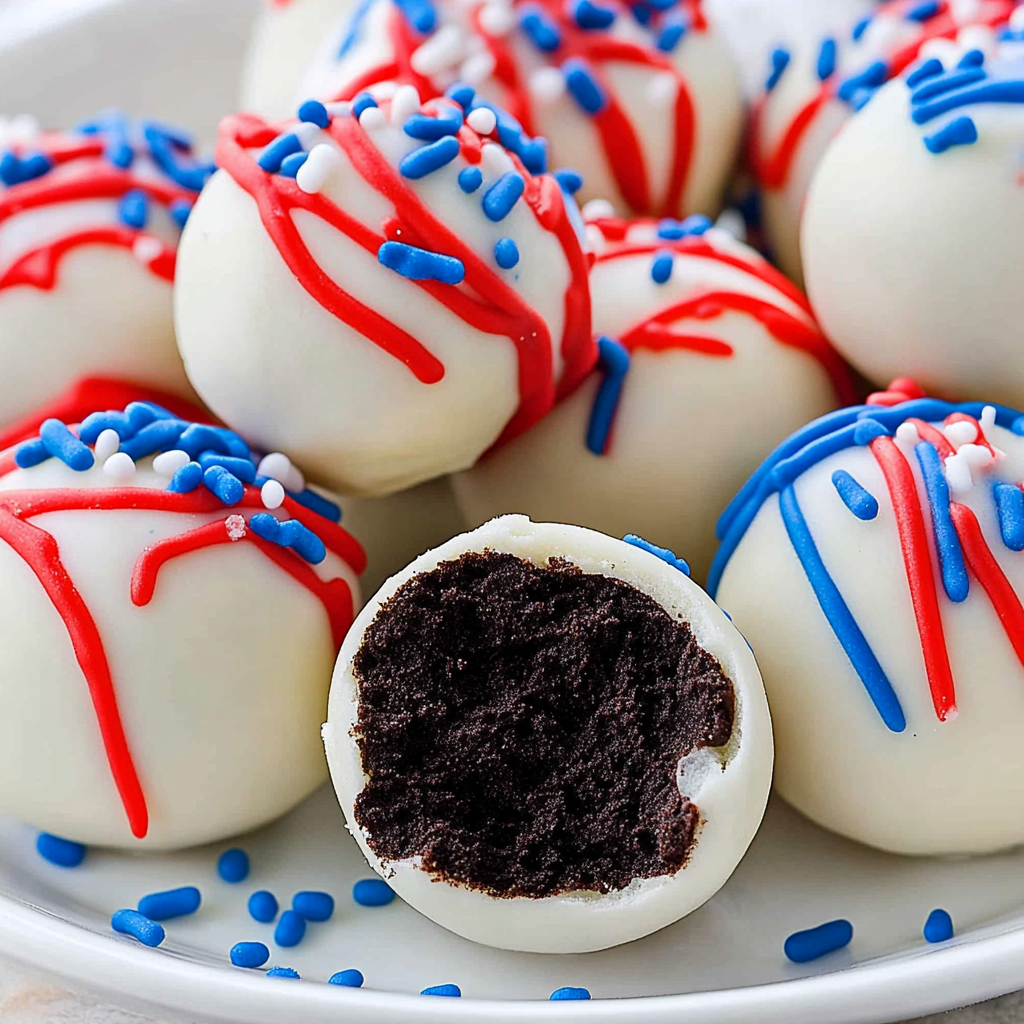
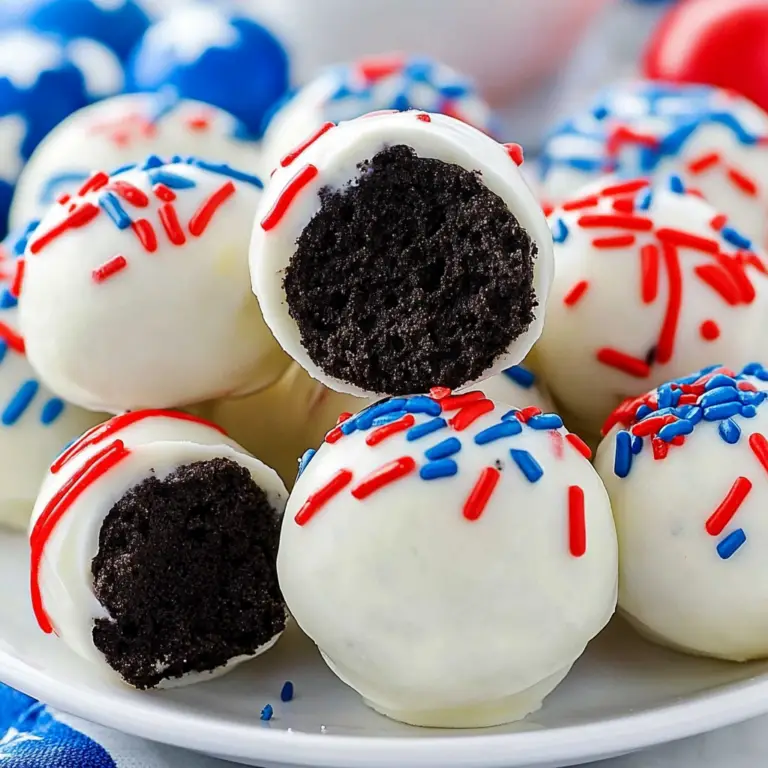
These 4th of July Oreo Balls are a delightful and festive treat that perfectly captures the spirit of summer celebrations! This no-bake dessert combines the rich flavors of Oreo cookies and cream cheese, creating a deliciously creamy texture. With their vibrant red, white, and blue colors, these Oreo balls not only taste amazing but also make for an eye-catching centerpiece at any Independence Day gathering or summer picnic.
Why You’ll Love This Recipe
- Easy to Make: You don’t need advanced baking skills. These Oreo balls come together quickly with minimal effort.
- No-Bake Delight: Enjoy this cool dessert without turning on the oven, perfect for hot summer days.
- Versatile Treat: Customize the colors and decorations for other holidays or celebrations.
- Kid-Friendly Fun: Involve your kids in rolling and decorating these festive treats for a fun family activity.
- Crowd-Pleaser: Whether at a barbecue or family gathering, these sweet bites are sure to impress guests of all ages.
Tools and Preparation
Before you dive into making these delicious 4th of July Oreo balls, gather the necessary tools. Having everything ready will streamline your process and make it even more enjoyable.
Essential Tools and Equipment
- Food processor
- Large mixing bowl
- Hand mixer
- Cookie scoop
- Baking trays
- Parchment paper
- Double boiler or microwave-safe bowl
Importance of Each Tool
- Food processor: Makes crushing the Oreo cookies quick and easy compared to manual methods.
- Hand mixer: Ensures smooth blending of cream cheese with the Oreo crumbs effortlessly.
- Baking trays: Provides a flat surface for chilling and decorating the Oreo balls without mess.
Ingredients
These 4th of July Oreo balls are the perfect patriotic dessert for the summer holidays! Super easy to make, this no-bake dessert is like a truffle and Oreo cheesecake all rolled into one!
- 1 lb Oreo Cookies (2.12 oz Family Size package)
- 8 ounces Cream cheese (softened to room temperature)
- 12 ounces Blue candy melts
- 12 ounces Red candy melts
- ⅓ cup White melting wafers
- White star confetti sprinkles for topping
How to Make 4th of July Oreo Balls
Step 1: Prepare Your Baking Trays
Line two baking trays with parchment paper and set them aside.
Step 2: Crush the Oreos
Place the Oreo cookies in a food processor or blender. Pulse them into fine crumbs. Alternatively, you can place them in a Ziploc bag and crush them with a rolling pin.
Step 3: Mix Cream Cheese
In a large mixing bowl, add the softened cream cheese. Beat with a hand mixer on high speed until smooth.
Step 4: Combine Mixtures
Add the crushed Oreo crumbs to the cream cheese. Mix on medium speed until well combined.
Step 5: Form Balls
Use a small cookie scoop to create evenly sized balls from the Oreo mixture. Roll each ball in your hands to make it smooth, then set them onto the prepared baking sheet.
Step 6: Chill The Balls
Place the balls in the refrigerator to chill for about 2 hours. If you’re short on time, you can freeze them for about 15-20 minutes instead.
Step 7: Melt Blue Candy Melts
Remove one tray of chilled balls from the refrigerator. In a double boiler over low heat, melt the blue candy melts, stirring every 30 seconds until smooth. You can also use a microwave-safe bowl if preferred.
Step 8: Dip in Blue Coating
Use a fork to dip each ball completely into the melted blue coating. Lift it out and tap to remove excess coating before placing it back on the baking tray. Immediately sprinkle with white star confetti before refrigerating again.
Step 9: Melt Red Candy Melts
Take out the second tray of chilled balls from the fridge. Using another clean double boiler on low heat, melt the red candy melts, stirring every 30 seconds until smooth.
Step 10: Dip in Red Coating
Dip each ball completely into the melted red coating using a fork. Lift it out, tap off excess coating, then return each ball back onto the cookie sheet.
Step 11: Drizzle White Melting Wafers
Using a small piping bag, microwave ⅓ cup white melting wafers in increments of 30 seconds until melted. Massage gently during intervals for even melting. Snip off a small piece from the end of the bag and drizzle white lines over red Oreo balls.
Step 12: Final Chill
Return all decorated balls to the refrigerator for about 10 minutes to set their coatings. Keep refrigerated until ready to serve!
How to Serve 4th of July Oreo Balls
These delightful 4th of July Oreo balls are not only a treat for the taste buds but also a feast for the eyes. Here are some creative ways to serve them at your next summer gathering.
Festive Platter
- Arrange the Oreo balls on a large platter, mixing blue, red, and white varieties for a festive presentation. Add some fresh strawberries or blueberries around the edges for an extra pop of color.
Individual Treat Bags
- Package each Oreo ball in small clear treat bags tied with red, white, and blue ribbons. This makes for a fun takeaway gift that guests can enjoy later.
Dessert Table Centerpiece
- Create a dessert table featuring your 4th of July Oreo balls as the centerpiece. Surround them with other themed desserts like fruit tarts and cupcakes decorated in patriotic colors.
Ice Cream Sundae Topping
- Crush some Oreo balls and use them as a topping for vanilla ice cream sundaes. Drizzle with chocolate syrup for an extra indulgence.
Picnic Treats
- Pack the Oreo balls in a cooler alongside other picnic favorites. Their sturdy nature makes them perfect for outdoor events without worrying about melting or mess.
Kids’ Party Favor
- At children’s parties, set up a DIY station where kids can decorate their own Oreo balls with sprinkles and colored frosting.
How to Perfect 4th of July Oreo Balls
To make your 4th of July Oreo balls even more delicious, consider these helpful tips that ensure they turn out perfectly every time.
- Chill Your Ingredients: Ensure your cream cheese is softened at room temperature before mixing. This allows for easy blending with the Oreo crumbs.
- Use Quality Candy Melts: Choose high-quality candy melts for coating the balls. They melt smoothly and create a beautiful finish.
- Even Sizing: Use a cookie scoop to make sure all your Oreo balls are evenly sized. This ensures even coating and consistent serving sizes.
- Add Flavor Variations: Experiment by adding peppermint extract or vanilla to the cream cheese mixture for a unique twist on flavor.
- Store Properly: Keep your finished Oreo balls refrigerated until you’re ready to serve them. This helps maintain their shape and texture.
- Decorate Creatively: Get creative with toppings! Besides star confetti, consider using edible glitter or colored sugar for added flair.

Best Side Dishes for 4th of July Oreo Balls
Pairing side dishes with your 4th of July Oreo balls can enhance your festive menu. Here are some delicious options to consider:
- Grilled Corn on the Cob: Brush with butter and sprinkle with salt or cheese for a simple summer classic.
- Caprese Salad Skewers: Fresh mozzarella, cherry tomatoes, and basil drizzled with balsamic glaze make a refreshing side.
- Potato Salad: A creamy potato salad filled with herbs adds heartiness to your dessert spread.
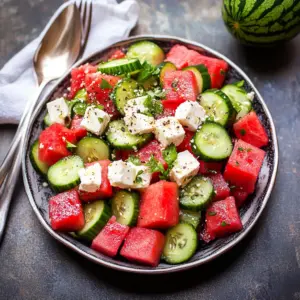
- Watermelon Feta Salad: The sweetness of watermelon combined with feta cheese provides a light contrast to rich desserts.
- Coleslaw: A tangy coleslaw balances flavors well and adds crunch to your table.
- Deviled Eggs: Classic deviled eggs offer protein and are easy to grab at parties—perfect finger food!
- Fruit Kabobs: Colorful skewers of seasonal fruits add freshness and appeal to your buffet while being easy to eat.
- Baked Beans: Sweet baked beans bring homey comfort to any summer gathering, complementing sweet treats beautifully.
Common Mistakes to Avoid
When making 4th of July Oreo Balls, small mistakes can lead to less-than-perfect results. Here are some common pitfalls to keep in mind:
- Using cold cream cheese: Starting with cream cheese that is too cold makes it difficult to mix smoothly. Always allow your cream cheese to soften at room temperature before using it.
- Not chilling the balls adequately: Skipping the chilling step can result in soft and misshapen Oreo balls. Make sure to chill them for at least 2 hours for the best shape and texture.
- Overheating candy melts: Candy melts can easily burn if heated too quickly. Use low heat and stir frequently, whether you’re using a double boiler or microwave.
- Skipping the sprinkles: It’s tempting to skip adding decorations, but they’re what make these 4th of July Oreo Balls festive! Add star confetti sprinkles right after coating for the best adhesion.
- Not letting the coating set: Rushing to serve without letting the chocolate set can lead to messy results. Allow enough time in the refrigerator for each coating to harden properly.
Refrigerator Storage
- Store in an airtight container.
- Keep in the refrigerator for up to one week.
- Layer with parchment paper if stacking.
Freezing 4th of July Oreo Balls
- Place in a freezer-safe container or bag.
- Freeze for up to three months.
- Thaw in the refrigerator before serving for best texture.
Reheating 4th of July Oreo Balls
- Oven: Preheat to 350°F (175°C). Place on a baking sheet and warm for about 5 minutes.
- Microwave: Heat on low power for short intervals (10-15 seconds) until slightly softened.
- Stovetop: Use a double boiler set on low heat. Place Oreo balls on top briefly until soft.
Frequently Asked Questions
Can I use different flavored Oreos for my 4th of July Oreo Balls?
You can definitely experiment with different flavored Oreos! Options like mint or peanut butter will give a fun twist while still keeping with the theme.
How do I make my own candy melts?
Making homemade candy melts is possible by melting white chocolate mixed with food coloring. Just ensure you temper it properly for best results.
Can I decorate these Oreo balls differently?
Absolutely! Feel free to customize your toppings or color themes according to your celebration’s needs, making them versatile desserts for any occasion.
How long do these 4th of July Oreo Balls last?
When stored correctly, they can last up to one week in the refrigerator or three months in the freezer, allowing you plenty of time to enjoy them!
Is this recipe suitable for kids?
Yes! This no-bake dessert is safe and easy enough for kids to help with, making it a fun family activity during holiday preparations.
Final Thoughts
These 4th of July Oreo Balls are not only a delightful treat but also a visually appealing addition to your summer celebrations. Their easy preparation makes them perfect for gatherings, and they can be customized with various flavors and toppings. Don’t hesitate; try making these festive bites, and enjoy their deliciousness with family and friends!
4th of July Oreo Balls
Celebrate Independence Day with these delicious 4th of July Oreo Balls, a no-bake dessert that combines the iconic flavors of Oreos and cream cheese. These vibrant treats are perfect for summer gatherings, featuring a creamy texture and festive red, white, and blue colors. Easy to make and fun for the whole family, these Oreo balls will not only satisfy your sweet tooth but also impress your guests. Whether for a barbecue, picnic, or dessert table centerpiece, they are sure to be the highlight of your celebration!
- Total Time: 7 minute
- Yield: Approximately 20 servings 1x
Ingredients
- 1 lb Oreo Cookies (2.12 oz Family Size package)
- 8 ounces Cream cheese (softened to room temperature)
- 12 ounces Blue candy melts
- 12 ounces Red candy melts
- ⅓ cup White melting wafers
- White star confetti sprinkles for topping
Instructions
- Line two baking trays with parchment paper.
- Crush the Oreo cookies in a food processor or blender until fine crumbs form.
- In a large mixing bowl, beat softened cream cheese with a hand mixer until smooth.
- Add crushed Oreo crumbs to the cream cheese and mix until well combined.
- Use a cookie scoop to form evenly sized balls and roll them smooth in your hands; place on prepared trays.
- Chill the balls in the refrigerator for at least 2 hours (or freeze for 15-20 minutes).
- Melt blue candy melts in a double boiler or microwave; dip each ball into the blue coating and sprinkle with white star confetti before refrigerating again.
- Repeat the process with red candy melts for the second tray.
- Drizzle melted white wafers over the red-coated Oreo balls before chilling again.
- Prep Time: 30 minutes
- Cook Time: None
- Category: Dessert
- Method: No-Bake
- Cuisine: American
Nutrition
- Serving Size: 1 ball (30g)
- Calories: 150
- Sugar: 15g
- Sodium: 50mg
- Fat: 7g
- Saturated Fat: 4g
- Unsaturated Fat: 2g
- Trans Fat: 0g
- Carbohydrates: 20g
- Fiber: 1g
- Protein: 1g
- Cholesterol: 10mg
Keywords: For added flavor, consider mixing in peppermint extract or vanilla into the cream cheese. Ensure your cream cheese is fully softened for easy blending. Experiment with different colored candy melts for various occasions.